Sue Skornia’s presentation at the Q.U. Guild meeting in June 2019 is presented in a series of lessons. This one covers:
Floating Star
Please scroll to the bottom for links to the rest of the lessons

Floating Star Quilt Instructions

Blocks: 6″ blocks set 10 x 12 plus 4″
borders Size: 60″ x 72″ before borders Final size: 68″ x 80″
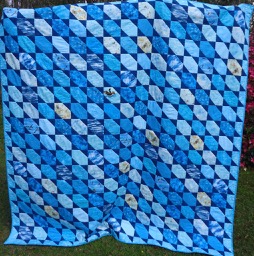
(either background or corners can vary but must contrast.) (See photo for one option)
Fabric needed:
Background: 3 yards
Cut 120 6½” squares and an inner border
Corners: One yard of one color or various scraps if background is light solid. Cut 98 3½” squares
Backing and binding: 4½ yards
Assembly:
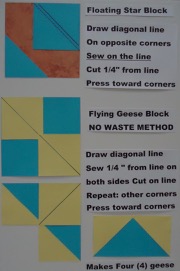
- Draw a diagonal line on the reverse side of each dark star tip square. The line should stretch from one corner to the opposite corner.
- Align the square with a corner of the background block, edges matched exactly and right sides together.
- Secure with a pin.
- Sew a seam on the marked line, removing pins before reaching them.
- Remove from the machine and cut away toward the corner 1/4 inch from the seam.
- Sew a second square to the background’s opposite corner.
- Press seam allowances towards the background (towards the corner if background is very light).
- Sew the blocks side-by-side into rows. The intersections where star tips meet the backgrounds should butt together nicely for a perfect match.
- Press new seam allowances in adjoining rows in opposite directions.
- Sew the rows together, butting seams to match block edges, by 2s, 4s, etc.
- Press all horizontal seams in one direction, as you finish each group.
- Add border. Layer, quilt in the ditch vertically and horizontally 4 times toward each side from the center and diagonally along the star points from the center toward 2 corners.
- Add binding.
3″ background squares with 1¾” squares for tips, finishes at 2½”
3½” background squares with 2″ squares for tips, finishes at 3″
4″ background squares with 2¼” squares for tips, finishes at 3½”
5½” background squares with 3″ squares for tips, finishes at 5″
6½” background squares with 3½” squares for tips, finishes at 6″
Specifics for various sizes of the Floating Star Quilt
Block size: 5 inches, plus 2½” border to make stars float (adds 5 inches to the length & width) (Border strips & corners can be of a different, lighter fabric to make stars appear to float.)
| Size with borders | Number of blocks | Border strips | Corners | Star points |
|---|---|---|---|---|
| 75″ x 75″ (14 x 14): | 196, 5 1/2″ sq. | 52, 5 1/2 x 3″ | 4, 3″ sq. | 444, 3″ sq. or 222, 3 1/2″ |
| Fabric needed: | 4.33 yards | 1 yard | 3 yards, 2 yards | |
| 70″ x 80″ (13 x 15) | 195, 5 1/2″ sq | 56, 5 1/2 x 3″ | 4, 3″ sq. | 446, 3″ sq. or 223, 3 1/2″ |
| Fabric needed: | 4.33 yards | 1 yard | 3 yards, 2 yards | |
| 80″ x 90″ (15 x 17): | 255, 5 1/2″ sq. | 64, 5 1/2 x 3″ | 4, 3″ sq. | 574, 3″ sq. or 287, 3 1/2″ |
| Fabric needed: | 5.33 yards | 1 yard | 3 1/2 yards, 2 1/3 yards |
Backing needed: (more if using for additional border or binding)
| 75 x 75 | 4 1/2 yards (81″ x 84″) |
| 70 x 80 | 4 1/2 yards, horizontal back seam (81″ x 84) |
| 80 x 90 | 5 yards, vertical back seam (90″ x 84″) |
Circumference (for binding)
| 75 x 75 | 310 inches or 8 strips across width of fabric | 2/3 yard of fabric |
| 70 x 80 | 310 inches or 8 strips across width of fabric | 2/3 yard of fabric |
| 80 x 90 | 350 inches or 9 strips across width of fabric | 2/3 yard of fabric |
Separated Floating Stars Instructions

Instructions assume No Directional Fabrics!
For 35″ x 35″ before borders: 9 stars
Cut:
49, 5.5 x 5.5 inch squares for background
54, 3 x 3 inch squares for star points
Assembly:
- Draw a diagonal line from corner to corner on the wrong side of the 3″ squares.
- Place 42 of the 3″ squares right side down on two (2) opposite corners of the right side of 21 background squares and place a pin across the lines.
- Place 12 of the 3″ squares right side down on one (1) corner of the right side of 12 background squares and place a pin across the lines. Sixteen background squares will have no star corners.
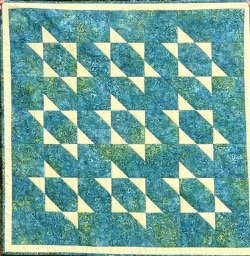
- Chain piece on all the lines. Trim to 1/4 inch on the right (toward the corner) side of the lines. Press toward the corner. Assemble the quilt in rows, (see photo of quilt) and press the seams one way on the odd numbered rows and the other way on the even ones. Sew the rows together and press all horizontal seams up or down.
For 55″ x 55″ before borders: 25 stars
Cut:
121, 5.5 x 5.5 inch squares for background
150, 3 x 3 inch squares for star points
- Draw a diagonal line from corner to corner on the wrong side of the 3″ squares.
- Place 130 of the 3″ squares right side down on two (2) opposite corners of the right side of 65 background squares and place a pin across the lines.
- Place 20 of the 3″ squares right side down on one (1) corner of the right side of 20 background squares and place a pin across the lines. Thirty-six background squares will have no star corners.
- Chain piece on all the lines. Trim to 1/4 inch on the right (toward the corner) side of the lines. Press toward the corner. Assemble the quilt in rows and press the seams one way on the odd numbered rows and the other way on the even ones. Sew the rows together and press all horizontal seams up or down.
More Lessons from Sue Skornia’s Presentation
General Instructions for Making and Completing Quilts
Lesson 1: Half-Square Triangles & Combinations of Half-Square Triangles with Squares
Lesson 2: Quarter-Square Triangles (hour glass) & Combinations of Quarter-Square Triangles with Squares
Lesson 3: Combination of Half-Square Triangles and Quarter-Square Triangles with Squares
Lesson 4: One-Quarter Triangle Square
Lesson 5: Floating Star

