2026 BLOCK OF THE MONTH
Ellen Fournier is leading us in making different improv blocks all this year. Choose colors and fabrics you like because we will not be collecting the blocks at the meetings — just showing them off! At the end of the year you can put together your own unique improv quilt.
January 2026 Block of the Month — Improv Log Cabin
Log Cabin blocks are a great introduction to improv quilting because you know the basic logic of the block and it is easier than a traditional log cabin! You will need at least 2 different fabrics and a ruler and rotary cutter for trimming edges as you build the block.
- Begin with a center block, square or rectangular. It doesn’t have to be perfectly square, but it should have 4 sides and approximately 90-degree corners.
- Cut several strips from your chosen fabrics. They can vary in width and do not need parallel edges. The longest needs to be a little longer than the final dimension of the block, i.e., if you plan on a 10” square make a few of your strips longer than 10”.
- Now begin to build your cabin. Sew a strip to one side of your center block and trim across the top of the center and the attached strip. Press seam away from the center. Sew a strip at least as long as the center plus the side strip to the top, press seam away from the center, and trim along of the side of the center block and the top strip.
- Continue adding strips in a spiral around the center, pressing away from the center and trimming as you go.
- When the log cabin reaches your intended size square it up!
You can add variety to the block by sewing two skinny strips together lengthwise and using that as a single strip, or by piecing together short pieces to make a strip.
Improv log cabin blocks are a good way to use scraps, especially for monochrome scrap blocks.
February 2026 Block of the Month — Fun with Curves
Improv curves use the same curved sewing technique as Drunkard’s Path blocks but
don’t require a special template!
- Begin with 2 squares of contrasting fabric, at least 1 inch larger than your desired
final size. - Lay one square exactly on top of the other, right sides facing up, and cut a curve through both with your rotary cutter, roughly in the center of the squares. The curve can be as gentle or tight as you want, but it is best to begin with a fairly gentle one.
- Sew together the left-hand piece of the top fabric and right-hand piece of the bottom fabric, overlapping the beginning and end of the seam by ¼ inch (just like a Drunkard’s Path block).
- Gently press the block and trim to desired size.
- Use the remaining pieces to make a color-reversed block.
This technique of cutting a curve on two pieces of fabric can also be used to insert
curvy strips or sections into blocks.
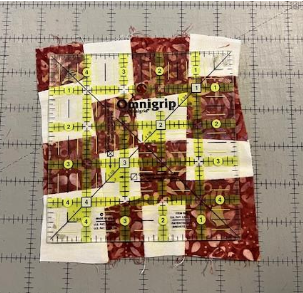
March 2026 Block of the Month – Freestyle 16-Patch
Sometimes it seems that Improv quilting should be easier than conventional quilting,
after all, there are no precise measurements or strict 90-degree angles. In my
experience, this block disproves that assumption. There are surprising ways it can go
wrong but I hope these instructions minimize the risk.
1.Choose fabric for this block with strong value contrast, whether you are using
multiple colors and prints or two colors.
2.Cut 4 freehand rectangles (really trapezoids) at least 2″ longer than your final
unfinished block height, and with total width at least 2.5″ wider than final
unfinished width.
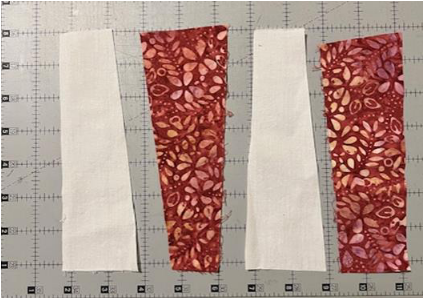
3.Lay these strips out alternating light and dark and wide ends (see photo) and
stitch them together. (I like to press the seams open.) Make sure the block is at
least as wide as your final unfinished width. (This block will be 5” unfinished.)
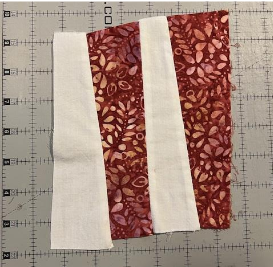
4.Cut this block into 4 roughly horizontal, roughly equal strips. Turn 2 of the strips 180
degrees (see photo) and stitch together.

5.Press the seams open and trim to desired size.
What can go wrong?
If the strips were too narrow or the angles too extreme the block will not be big
enough (ask me how I know). Sometimes you can fix this by restitching scantier
seams.
If the strips are too wide the outside patches will be too small. You can fix this with
wider seams, before the final trim.
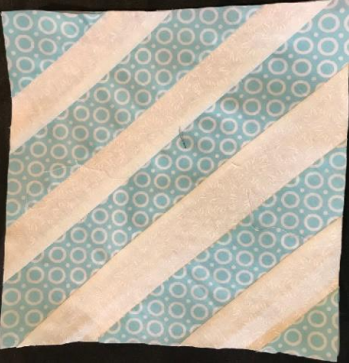
April 2026 Block-of-the-Month – String Pieced Improv Block (FPP)
This block doesn’t have to use foundation paper piecing (FPP), but for me it works
better this way. I learned from last year’s Stripper Blocks that without a paper
foundation my blocks did not lie flat. If you have better luck than me, feel free to skip
the paper.
- Start by drawing a square the size of your block on a sheet of lightweight paper.
- Cut several strips of your fabric of different lengths and widths, but at least a few
longer than the diagonal of your square. The sides don’t need to be exactly
parallel, but they should be straight. - Using a glue stick or pins, attach one long strip diagonally from corner to corner
of the paper square on the wrong side of the paper. The right side of the fabric is
facing up. (You can use a light table to check this or hold the paper up to a
bright light.) - Place a strip of contrasting fabric right side down on this first strip, matching long
edges on one side. Make sure it covers the sides of the square on each end. - Using short stitches, machine stitch this strip to the first strip along the matching
edge and then fold it back (exposing the right side of the fabric) and gently
press it down. Repeat these steps with another strip of contrasting fabric on the
other long edge of the first strip. - Continue to add contrasting fabric strips, working out from the center of the
block until the square that you drew is totally covered. - Working from the wrong (paper) side, trim the block to desired size. I like to use a
ruler instead of the square drawn on the paper because sometimes the stitching
causes the square to shrink slightly, especially if there are a lot of pieces. - I like to wait to remove the paper until I’m ready to use the block. When you are
ready to do this, gently tear the paper along the stitching lines, taking care not
to stretch the seams.
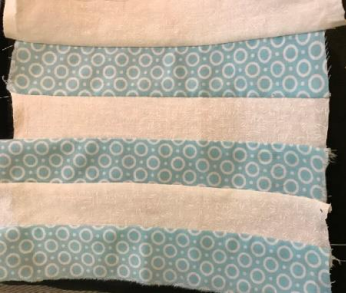
2025 BLOCK OF THE MONTH
In 2025, Peggy Clark asked you to be a
“QU Stripper.”
Ten of the blocks of the month in 2025 were 8 and 1/2 inch square that was either sewn diagonally or straight across. In April we contributed to the Big Bend Hospice Quilted Squares Project.